InsightIQ Error: The InsightIQ user on the cluster does not have permission to view quota reports.


Error: The InsightIQ user on the cluster does not have permission to view quota reports.

Fix
  1. Verify from InsightIQ server configuration to confirm the user being used for cluster connection.  Go to InsightIQ server WebUI page, and click on Settings -> Configure (click on the link associated with the cluster in question).  Check what username is being used for monitoring.  By default we use user - insightiq, If it is Different user follow the below Steps for that particular User ID instead of UserID: InsightIQ (If it a domain user, use the user id as <User_ID@Domain>).

  1. Login to cli of the cluster node in question as root user.

  1. Verify the current set of privileges associated with insightiq user:
//isi auth mapping token <User_ID@Domain>
# isi auth mapping token insightiq
                   User
                       Name : insightiq
                        UID : 15
                        SID : S-1-22-1-15
                    On Disk : 15
                    ZID: 1
                   Zone: System
             Privileges: ISI_PRIV_LOGIN_PAPI
                         ISI_PRIV_EVENT
                         ISI_PRIV_JOB_ENGINE
                         ISI_PRIV_STATISTICS

  1. Check if any role is assigned to user account InsightIQ, If it is there; like I Bolded below; skip step 5 and go to Step 6. If no role assigned then go to Step 5
IsilonCluster# isi auth roles list --v | grep -B4 -i insightiq
      Read Only: True
--------------------------------------------------------------------------------
       Name: InsightIQRole
Description: -
    Members: insightiq

  1. Create a new Role and add user to that Role
IsilonCluster# isi auth roles create InsightIQRole --description "Allows access to read and write SmartQuotas data and settings, as well as read filesystem namespace, snapshot, and smartpools information."
IsilonCluster# isi auth roles modify InsightIQRole --add-user insightiq

  1. Run the following set of commands to give insightiq user additional privileges:

IsilonCluster# isi auth roles modify InsightIQRole --add-priv ISI_PRIV_QUOTA
IsilonCluster# isi auth roles modify InsightIQRole --add-priv ISI_PRIV_NS_IFS_ACCESS
IsilonCluster# isi auth roles modify InsightIQRole --add-priv ISI_PRIV_NS_TRAVERSE
IsilonCluster# isi auth roles modify InsightIQRole --add-priv ISI_PRIV_SNAPSHOT
IsilonCluster# isi auth roles modify InsightIQRole --add-priv ISI_PRIV_SMARTPOOLS

  1. Verify again the privileges associated with insightiq user to make sure you see the following:

IsilonCluster# isi auth mapping token insightiq
                   User
                       Name : insightiq
                        UID : 15
                        SID : S-1-22-1-15
                    On Disk : 15
                    ZID: 1
                   Zone: System
             Privileges: ISI_PRIV_LOGIN_PAPI
                         ISI_PRIV_EVENT
                         ISI_PRIV_JOB_ENGINE
                         ISI_PRIV_QUOTA
                         ISI_PRIV_SMARTPOOLS
                         ISI_PRIV_SNAPSHOT
                         ISI_PRIV_STATISTICS
                         ISI_PRIV_NS_TRAVERSE
                         ISI_PRIV_NS_IFS_ACCESS
Logon to the InsightIQ server CLI (through Putty), and restart IIQ service with the following command:
InsightIQ# sudo /sbin/service insightiq stop
Stopping insightiq:                                        [  OK  ]
InsightIQ# sudo /sbin/service insightiq start
Starting insightiq:                                        [  OK  ]

  1. Verify if the Quota Reporting page can be displayed correctly from the InsightIQ WebUI page.

Ref:

ViPR SRM 4.3 - Troubleshooting : SocketWriter::sendBuffer(): Can't write to Backend Host


Issue:
  1. ViPR SRM Missing Alert Definition default templates under > SRM Admin UI > Config > Alerts > Manage Alert Definitions.

Errors in Logs:
Server: Primary Backend - Event-Processing-Manager - Alert-Consolidation
Install Path:  Event-Processing/Event-Processing-Manager/Alert-Consolidation
Viewing File 'logs/processing-0-0.log'
WARNING  -- SocketWriter::sendBuffer(): Can't write to <Primary Backend>/xx.xxx.xxx.xxx:2013. Retrying 10 times…
java.net.ConnectException: Connection refused
    at sun.nio.ch.SocketChannelImpl.checkConnect(Native Method)
    at sun.nio.ch.SocketChannelImpl.finishConnect(SocketChannelImpl.java:717)
    at com.watch4net.events.processing.writers.generic.nio.ChannelWriter.completeConnection(ChannelWriter.java:102)
WARNING  -- [2019-11-21 17:14:31 EST] -- StreamFlusher::run(): Unable to flush the buffer. Some events might be lost...
java.io.IOException: Can't write to <Primary Backend>/xx.xxx.xxx.xxx:2013
    at com.watch4net.events.processing.writers.generic.SocketWriter.sendBuffer(SocketWriter.java:311)

Server: Primary Backend - Alerting-Backend - Default
Install Path:  Backends/Alerting-Backend/Default
Viewing File 'logs/alerting-0-0.log'
WARNING  -- SocketSource$DataReaderWorker::run(): An incoming event could not be processed: com.watch4net.events.common.serialization.SerializationException: Invalid data type
SEVERE   -- SocketSource$DataReaderWorker::run(): Unable to read from socket... Aborting
java.net.SocketException: Socket closed

Cause: dropping of data due to contention (or) Connection Brocken b/w Alert Consolidation and Alerting Blackened.

Fix/Resolution/Work Around:

  1. Increase the Available memory for the service 'Event-Processing-Manager - Alert-Consolidation'
             >> Go to Physical Overview in SRM > Select "Primary BackEnd' > Click on 'Services' Tab > Click on 'Event-Processing-Manager - Alert-Consolidation' > Click on Gear box 'Configure Service' > Increase the Available memory for the service (Custom 2GB) '3000' MB > Save it


  1. Increase the Available memory for the service 'Event-Processing-Manager - Alert-Consolidation'
             >> Go to Physical Overview in SRM > Select "Primary BackEnd' > Click on 'Services' Tab > Click on 'Alerting-Backend - Default' > Click on Gear box 'Configure Service' > Increase the Available memory for the service (Custom 2GB) '3000' MB > Save it
  1. Restart the Service 'Alerting-Backend - Default'
  2. Restart the Service 'Event-Processing-Manager - Alert-Consolidation'
  3. Give couple of Mins, and check whether you can see the Alert Definition templates under > SRM Admin UI > Config > Alerts > Manage Alert Definitions.

FYI:

Isilon Cluster AD Integration & Root Privileges to AD Group

Error1:
zsh: permission denied: isi_for_array
Fix:
>> normal you see this issue, if you dont have permission to run the command
or you are not running commands with root user
or you forgot to put sudo in fornt of the command when you are using non root user account
>> you can fix this issue by modify the sudo file to give access to all users to all commands
//Open the sudo file to add access to the Groups or Users
isi_visudo -f /etc/mcp/override/sudoers
>>click "insert" button to edit the file, add the below any entry based on your requirement
#Below Command to give access to all users
ALL ALL=(ALL) NOPASSWD: ALL
#Below Command to give access to Domain User to all CMDs
<DOMAIN>\\<USERID> ALL=(ALL) NOPASSWD: ALL
#Below Command to give access to Islon Cluster Local User to all CMDs
<USERID> ALL=(ALL) NOPASSWD: ALL
#Below Command to give access to Islon Cluster Local Group users to all CMDs
%<LocalGroupName> ALL=(ALL) NOPASSWD: ALL
>>Press Esc and enter ":wq" to write the changes to the file
Now run your command with "sudo" in front of the command, like below
Example:
IsilonCluster1-2% isi_for_array -s 'isi_hw_status | grep -i serno'
zsh: permission denied: isi_for_array
IsilonCluster1-2% sudo isi_for_array -s 'isi_hw_status | grep -i serno'
IsilonCluster1-1:   SerNo: XXXXXXXXXXX
IsilonCluster1-2:   SerNo: XXXXXXXXXXX

Error2: 
Could not chdir to home directory /ifs/home/DOMAIN/USERID: No such file or directory
Fix:
Normally you see this error, if the user that logged in doest have a Home Directory, either you create manually.
if you are a domain user, make you "Create home directories on first login" option is checked under the domain in Active Directory
GUi > Access > Authrentication Providers > Active Directory

How to setup Full Previllages to AD Groups on Isilon Cluster ?
1. Login to the GUi > Access > Authrntication Providers > Active Directory > + Join a Domain > Fill the details > Join.
Once it is joined succussfully, and status is showing "Online", goto next step
Note: for Isilon OneFS v8.1.2.0 and above make sure "Create home directories on first login" option is check.
if it is not checked, Users after loggin into putty, maybe be able to use Tab Functionality

2. Login to Isilon Cluster CLI as root through SSH tools like Putty. and run the below commands

//Create a Role First like "StorageAdmins"
isi auth roles create --name StorageAdmins --description "Full Admin Privileges to the Cluster"

//Add AD Group to the Role
isi auth roles modify StorageAdmins --add-group=ADGroup1@Domain

//you can add more groups to the same role like below
isi auth roles modify StorageAdmins --add-group="ADGroup2@Domain"

//Add Previllages to the Role that was created earlier "StorageAdmins" (Below is list of full Previllages)
isi auth roles modify StorageAdmins --add-priv ISI_PRIV_ANTIVIRUS
isi auth roles modify StorageAdmins --add-priv ISI_PRIV_AUDIT
isi auth roles modify StorageAdmins --add-priv ISI_PRIV_AUTH
isi auth roles modify StorageAdmins --add-priv ISI_PRIV_CERTIFICATE
isi auth roles modify StorageAdmins --add-priv ISI_PRIV_CLOUDPOOLS
isi auth roles modify StorageAdmins --add-priv ISI_PRIV_CLUSTER
isi auth roles modify StorageAdmins --add-priv ISI_PRIV_DEVICES
isi auth roles modify StorageAdmins --add-priv ISI_PRIV_ESRS_DOWNLOAD
isi auth roles modify StorageAdmins --add-priv ISI_PRIV_EVENT
isi auth roles modify StorageAdmins --add-priv ISI_PRIV_FILE_FILTER
isi auth roles modify StorageAdmins --add-priv ISI_PRIV_FTP
isi auth roles modify StorageAdmins --add-priv ISI_PRIV_HARDENING
isi auth roles modify StorageAdmins --add-priv ISI_PRIV_HDFS
isi auth roles modify StorageAdmins --add-priv ISI_PRIV_HTTP
isi auth roles modify StorageAdmins --add-priv ISI_PRIV_IFS_BACKUP
isi auth roles modify StorageAdmins --add-priv ISI_PRIV_IFS_RESTORE
isi auth roles modify StorageAdmins --add-priv ISI_PRIV_IFS_WORM_DELETE
isi auth roles modify StorageAdmins --add-priv ISI_PRIV_JOB_ENGINE
isi auth roles modify StorageAdmins --add-priv ISI_PRIV_LICENSE
isi auth roles modify StorageAdmins --add-priv ISI_PRIV_LOGIN_CONSOLE
isi auth roles modify StorageAdmins --add-priv ISI_PRIV_LOGIN_PAPI
isi auth roles modify StorageAdmins --add-priv ISI_PRIV_LOGIN_SSH
isi auth roles modify StorageAdmins --add-priv ISI_PRIV_MONITORING
isi auth roles modify StorageAdmins --add-priv ISI_PRIV_NDMP
isi auth roles modify StorageAdmins --add-priv ISI_PRIV_NETWORK
isi auth roles modify StorageAdmins --add-priv ISI_PRIV_NFS
isi auth roles modify StorageAdmins --add-priv ISI_PRIV_NS_IFS_ACCESS
isi auth roles modify StorageAdmins --add-priv ISI_PRIV_NS_TRAVERSE
isi auth roles modify StorageAdmins --add-priv ISI_PRIV_NTP
isi auth roles modify StorageAdmins --add-priv ISI_PRIV_QUOTA
isi auth roles modify StorageAdmins --add-priv ISI_PRIV_REMOTE_SUPPORT
isi auth roles modify StorageAdmins --add-priv ISI_PRIV_ROLE
isi auth roles modify StorageAdmins --add-priv ISI_PRIV_SMARTPOOLS
isi auth roles modify StorageAdmins --add-priv ISI_PRIV_SMB
isi auth roles modify StorageAdmins --add-priv ISI_PRIV_SNAPSHOT
isi auth roles modify StorageAdmins --add-priv ISI_PRIV_SNMP
isi auth roles modify StorageAdmins --add-priv ISI_PRIV_STATISTICS
isi auth roles modify StorageAdmins --add-priv ISI_PRIV_SWIFT
isi auth roles modify StorageAdmins --add-priv ISI_PRIV_SYNCIQ
isi auth roles modify StorageAdmins --add-priv ISI_PRIV_SYS_SHUTDOWN
isi auth roles modify StorageAdmins --add-priv ISI_PRIV_SYS_SUPPORT
isi auth roles modify StorageAdmins --add-priv ISI_PRIV_SYS_TIME
isi auth roles modify StorageAdmins --add-priv ISI_PRIV_SYS_UPGRADE
isi auth roles modify StorageAdmins --add-priv ISI_PRIV_VCENTER
isi auth roles modify StorageAdmins --add-priv ISI_PRIV_WORM

//Open the sudo file to add access to the Groups or Users
isi_visudo -f /etc/mcp/override/sudoers
>>click "insert" button to edit the file, add the below entry
ALL ALL=(ALL) NOPASSWD: ALL
>>Press Esc and enter ":wq" to write the changes to the file

3. Verify the access by relogin to the putty
login as: <DOMAIN>\<USERID>
Using keyboard-interactive authentication.
Password: **********

How to expand disk space in VIPR SRM Vapp?

Issue: Low File System Space on root; Due to increased Data Center growth on ViPR SRM

Procedure for expand disk space in VIPR SRM Vapp:
1. Add new disk on the VM (Dont Expand the Existing disk)
2. SSH into the SRM Vapp
3. run command >> expand_disk.pl
4. verify the expanded capacity: CMD:~# df -l 
5. restart the service: CMD:~# ./manage-modules.sh service restart all

Reference:
494944 : ViPR SRM: How to expand  disk space in VIPR SRM? https://support.emc.com/kb/494944
459138 : ViPR SRM: Reclaiming disk space after incorrectly expanding the vApp virtual machine disk provisioning https://support.emc.com/kb/459138

Sample Output:


In Unity Array, How to Transfer Files from the Peer SP


In Unity Array, In general only the primary SP has direct access to the network, if you want to download files from the peer SP there is no direct network access.You can access the peer SP, for file transfer, via an ssh tunnel via Putty.
The advantage of doing this, you dont need to copy files from peer SP to Primary SP.

On a Unity Array, each SP has an internal network interface named: eth_int
For SPA the address assigned to eth_int is: 128.221.255.100
For SPB the address assigned to eth_int is: 128.221.255.101

you can verify this by logging putty session into Unity with service account, and ping SPA & SPB like below


Create Session with Unity Mgmt IP <10.1.2.3> and using port 22


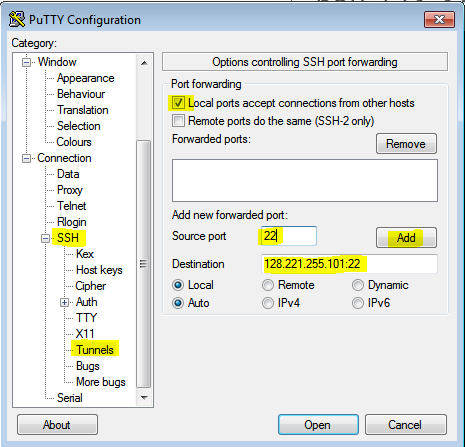
Go to: "Connection > SSH > Tunnels" Click "Local ports accept connections from other hosts" and create a tunnel for SPA (128.221.255.100) on tcp port 22 then Click Add Button


This is the result of clicking Add Button, Now Click on Open Button


Open up putty Session and login to the Primary SP, leave this session open.


Open Up a WinSCP session and login to SPB using 'localhost" as the address


Then transfer Your Files


Ref: https://support.emc.com/kb/499330

You can also transfer the file to primary SP, and download using FTP tools like WinSCP
Syntax:
scp your-file peer:/home/service

Example:
service@(none) spa:/home/service/> scp test_file.tar peer:/home/service

Ref: https://community.emc.com/docs/DOC-66234


Isilon Troubleshoot Guide

Error#1 : Node's Baseboard Management Controller (BMC) and/or Chassis Management Controller (CMC) are unresponsive. Hardware is no longer being monitored

Issue : The Baseboard Management Controller (BMC) and/or Chassis Management Controller (CMC) on S210, X210, X410, NL410 and HD400 nodes can sometimes become unresponsive. When this issue occurs, the affected node may produce an event (900010011)

Resolution:

Check below version are matching, if not you need to upgrade to the recommended

BMC (Baseboard Management Controller) firmware to version 1.25 and above 
CMC (Chassis Management Controller) firmware to version 02.05 and above
OneFS version to 8.0.0.4 or 8.0.1.1 or newer

How to check BMC & CMC firmware versions ?
IsilonCluster1-X# isi upgrade cluster firmware devices

Device Type Firmware Mismatch Lnns
---------------------------------------------------------------------------
BMC_S1400FP        BMC      1.25.9722               -         1-9,14-16,19
BMC_S2600CP        BMC      1.25.9722               -         13,17-18
BMC_S2600CP        BMC      1.20.5446               -         10-12
CMC_HFHB           CMC      01.02                   -         10-12
CMC_HFHB           CMC      02.05                   -         13
CMC_Yeti           CMC                           -         8
CMC_Yeti           CMC      00.0b                   -         1-7,9
CMC_Yeti           CMC      02.05                   -         14
CMC_HFHB           CMC      02.07                   -         17-18
CMC_Yeti           CMC      02.07                   -         15-16,19
......................
---------------------------------------------------------------------------
Total: xx

If Firmware is missing for particular Lnns, maybe that particular node is not responding, you may need to reboot the node.

How to Check BMC Version on Particular Node:
IsilonCluster1-8# /usr/bin/isi_hwtools/isi_ipmicmc -d -V -a bmc | grep firmware IPMI firmware version = 01.25

Reset BMC/CMC
- To reset the BMC on all nodes in the cluster, run the following command:
# isi_for_array -s /usr/bin/isi_hwtools/isi_ipmicmc -c -a bmc

- When this completes, reset the CMC on all nodes in the cluster by running the following command:
# isi_for_array -s /usr/bin/isi_hwtools/isi_ipmicmc -c -a cmc

- If the cluster contains HD400 or X210 nodes, also run the following command to reset the CAR:
# isi_for_array -s /usr/bin/isi_hwtools/isi_ipmicmc -c -a car

for upgrade the Firnware, refer the below KB Article Number 000466373
https://emcservice.force.com/CustomersPartners/kA2j0000000R5lGCAS


Isilon - The /var partition is near capacity


Issue: When the /var partition reaches 75%, 85%, or 95% of capacity, an event is logged and an alert is sent.

Fix: Rotate logs
If the /var partition returns to a normal usage level, review the list of recently written logs to determine if a specific log is rotating frequently. Rotation can resolve the full-partition issue by compressing or removing large logs and old logs, thereby automatically reducing partition usage.
Check the percentage of free isilon nodesOpen an SSH connection to the node that reported the error and log in using the "root" account.
Run the following command:
df -i |grep var |grep -v crash

Output similar to the following appears:
Filesystem 1K-blocks Used Avail Capacity iused ifree %iused Mounted on
/dev/mirror/var0 1013068 49160 882864 5% 1650 139276 100% /var

If the %iused value is 90% or higher, reduce the number of files in the /var partition using one of the methods described below:
Remove files that do not belong in the /var partition.
On the node that generated the alert, run the following command to list files in the /var partition that are greater than 5 MB:

find -x /var -type f -size +10000 -exec ls -lh {} \; | awk '{ print $9 ": " $5 }'

In the output, look for files that do not typically belong in the /var partition. For example, a OneFS installer file, log gathers, or a user-created file.
Remove the files or move them to the /ifs directory. If you are unsure what to remove, contact Isilon Technical Support for assistance.
Determine if a process is holding a large file open

You can use the fstat command to list the open files on a node or in a directory, or to list the files that were opened by a particular process. A list of the open files can help you monitor the processes that are writing large files. See How to use the fstat command to list the open files on a node, 16648 .

If neither of the above tasks resolves the issue, continue with the following solution:
Limit the rollover file size and compress the file
Open an SSH connection on any node in the cluster and log in using the "root" account.
Run the following commands to create a backup of the /etc/newsyslog.conf file:
cp /etc/newsyslog.conf /ifs/newsyslog.conf
cp /etc/newsyslog.conf /etc/newsyslog.bak

Open the /ifs/newsyslog.conf file in a text editor.
Locate the following line:
/var/log/wtmp 644 3 * @01T05 B

Change the line to:
/var/log/wtmp 644 3 10000 @01T05 ZB

These changes instruct the system to roll over the /var/log/wtmp file when it reaches 10 MB and to compress the file with gzip.
Save and close the /ifs/newsyslog.conf file.
Run the following command to copy the updated file to all nodes on the cluster:
isi_for_array 'cp /ifs/newsyslog.conf /etc/newsyslog.conf'

If other logs are rotating frequently, or if the preceding solutions do not resolve the issue, run the isi_gather_info command to gather logs, and then contact Isilon Technical Support for assistance.

Ref: EMC KB Article 000471789

/var/log/isi_phone_home.log can grow without bound and fill up /var partition, causing issue with CELOG event generation and other operational issues with processes

Issue: /var/log/isi_phone_home.log can grow without bound and fill up /var partition, causing issue with CELOG event generation and other operational issues with processes

Cause: Log rotation does not work to auto rotate log file generated by isi_phone_home

Fix: if /var is getting too full (>85%) for any of the nodes, then run the following command:
# isi_for_array 'truncate -s 0 /var/log/isi_phone_home.log'

Ref: EMC KB Article Number 000516735

Isilon Health Check script

#cd to the Isilon Support Directory
IsilonCluster-1# cd /ifs/data/Isilon_Support

#Copy the Script from EMC through FTP
IsilonCluster-1# curl --disable-epsv -O ftp.emc.com/pub/rcm/Isilon/tools/IOCA
  % Total    % Received % Xferd  Average Speed   Time    Time     Time  Current
                                 Dload  Upload   Total   Spent    Left  Speed
100  499k  100  499k    0     0  70871      0  0:00:07  0:00:07 --:--:--  233k

#Run the Script
IsilonCluster-1# perl IOCA

Output looks Similar like below:
Isilon On-Cluster Analysis                        0.1206
Live Cluster Analysis                             Wed Sep 19 10:43:08 2018
Cluster Name                                      IsilonCluster
Cluster GUID                                      XXXXXXXXXXXXXXXXXXXXXX
Node Count                                        6
Current OneFS Version                             8.0.0.4
Contact Information                               PASS
Email Settings                                    PASS
System Partition Free Space                       PASS
Drive Support Package (1.26)                      INFO
FCO F042415EE                                     PASS
FCO F031617FC/KB469133                            PASS
Highly Recommended Patches                        PASS
Node Firmware (10.1.6)                            INFO
ETAs                                              PASS
Hardware Status                                   PASS
BMC/CMC Hardware Monitoring                       PASS
Boot Disks                                        PASS
BXE Nodes                                         PASS
  DETAILS: 22 nodes have BXE interfaces: 1-4,9-26
Drives Health                                     PASS
Drive Load                                        PASS
Drive Stall Timeout                               PASS
Duplicate Gateway Priority                        PASS
Processes                                         PASS
IB Interfaces Active                              PASS
Memory                                            PASS
Mirror Status                                     PASS
Node Compatibility                                PASS
Access Zones                                      PASS (3)
OneFS Version                                     PASS
KB507031                                          PASS
Authentication Status                            PASS
Cluster Capacity                                  PASS
Cluster Encoding                                  PASS (utf-8)
DialHome & Remote Connectivity                    PASS
  DETAILS: Current Service States:
  DETAILS:    ConnectEMC Service is Enabled
  DETAILS:    RemoteSupport (isi remotesupport) is enabled
Critical Events                                   PASS
File Sharing                                      PASS
HDFS                                              PASS
SPN List                                          PASS
Cluster Health Status                             PASS
IDI Errors                                        PASS
Jobs Status                                       PASS
Jobs History                                      PASS
Licenses                                          PASS
LWIOD Log                                         PASS
Listen Queue Overflows                            WARN
  WARN: Listen Queue Overflows count over 50,000 on the following nodes: 1
NFS                                               PASS
Kernel Open Files Count                           PASS
Storage Pools                                     PASS
Cluster Services                                  PASS
SmartConnect Service IP                           PASS
Snapshot                                          PASS
SyncIQ                                            PASS
Cluster Time Drift                                PASS
Cluster Time Sync                                 PASS
Cluster Time Zone                                 PASS (America/Los_Angeles)
Upgrade Agent Port                                PASS
Upgrade Status                                    PASS
Node Uptime                                       PASS (100 days)


Physical Server with Unity Boot LUN got rebooted during Unity SP Reboot

Issue:  Physical Server with Unity Boot LUN got rebooted during Unity SP Reboot

Errors:
Warning Host 1076      User1  The reason supplied by user XXXXX for the last unexpected shutdown of this computer is: Other (Unplanned) Reason Code: 0xa000000 Problem ID: Bugcheck String:
Error SHost       1001      Microsoft-Windows-WER-SystemErr           The computer has rebooted from a bugcheck. The bugcheck was: 0x000000d1 (0xffffe8013242b000, 0x0000000000000002, 0x0000000000000000, 0xfffff8017ad60e81). A dump was saved in: C:\Windows\MEMORY.DMP. Report Id: DDMMYY-35046-01.

Cause: this is a known issue with Microsoft Security patch and PowerPath. one of the security patches installed which caused the server to bluescreen and crash

Fix:
This is a known  issue with PowerPath and Microsoft latest update for Windows 2012 servers.
This is due to the updates by Microsoft Windows 2012 R2 update KB3185279, KB3185331, KB3192404, KB3197875, KB3197874, KB3205401 recently.
https://support.microsoft.com/en-in/help/24717/windows-8-1-windows-server-2012-r2-update-history

Please find the KB article to fix the issue
490865 : Windows 2012 R2 server crash pointing to EMC PowerPath driver EMCPMPX.SYS https://support.emc.com/kb/490865

++++++++++++++++++++++++++++++++++++++++++++++++++++
OS Name             Microsoft Windows Server 2012 R2 Standard
Version 6.3.9600 Build 9600
Other OS Description      Not Available
OS Manufacturer             Microsoft Corporation
System Name    HostName
System Manufacturer    Cisco Systems Inc
System Model   UCSB-B200-M3
System Type      x64-based PC

  manfac: Cisco Systems, Inc.
   sernum: FCH1824J0E9
    model: Cisco VIC FCoE HBA
   descrp: Cisco VIC-FCoE Storport Miniport Driver
   symblc: Cisco VIC FCoE HBA FW:2.1(3d) DRV:2.3.0.20
 
 EMC powermt for PowerPath (c) Version 6.0 SP 2 (build 206)
             
*******************************************************************************
*                        Bugcheck Analysis                                    *
*******************************************************************************
Bugcheck code 000000D1
Arguments ffffe801`3242b000 00000000`00000002 00000000`00000000 fffff801`7ad60e81

RetAddr           : Args to Child                                                           : Call Site
fffff802`9d1e3ee9 : 00000000`0000000a ffffe801`3242b000 00000000`00000002 00000000`00000000 : nt!KeBugCheckEx
fffff802`9d1e273a : 00000000`00000000 ffffe001`a31b6010 00000000`00000000 fffff801`7ad6a00c : nt!setjmpex+0x37d9
fffff801`7ad60e81 : fffff801`7ad74dbf ffffe801`270008d0 00000000`00000000 7fffffff`ffffffff : nt!setjmpex+0x202a
fffff801`7ad74dbf : ffffe801`270008d0 00000000`00000000 7fffffff`ffffffff 00000000`00000000 : EmcpMpx!EmcpMpxLogPlatfEvent+0x3f99
fffff801`7ad75236 : fffff801`7ad74f50 ffffe001`a31b68b0 ffffe001`a5400480 00000000`00000000 : EmcpMpx!EmcpMpxLogPlatfEvent+0x17ed7
fffff801`7ad62958 : ffffe001`a1e0f010 ffffe001`a0be8010 ffffe001`a0bd3be0 ffffe801`270008d0 : EmcpMpx!EmcpMpxLogPlatfEvent+0x1834e
fffff801`7ad5c1c0 : ffffe001`a16c42a0 ffffe801`270007d0 ffffe801`270008d0 ffffe801`331ae810 : EmcpMpx!EmcpMpxLogPlatfEvent+0x5a70
fffff801`7ac21dcf : ffffe001`a15e2010 00000000`00000016 00000000`00000002 00000000`00000000 : EmcpMpx!PxDsmLamUnregister+0x1d14
fffff801`7ac082d0 : 00000000`00010000 00000000`00000004 ffffe001`a16c41b0 00000000`ffffffff : MPIO!DsmGetVersion+0xb2b
fffff801`7ac08b13 : 00000000`00000000 ffffe801`331ae810 00000000`00000007 ffffe801`269d8410 : MPIO+0x82d0
fffff802`9d13043e : ffffe001`a1c4d650 ffffe801`331ae810 ffffe801`27801a01 ffffe801`c00000c0 : MPIO+0x8b13
fffff801`7b28f5b3 : ffffe801`331ae810 fffff801`7b291a00 00000000`00010000 ffffe001`a16c41b0 : nt!IoCompleteRequest+0x2fa
fffff801`7b291574 : ffffe801`2713eba0 ffffe001`a16c41b0 ffffe801`331ae810 fffff801`7b28d60e : storport!StorPortNotification+0x2173
fffff801`7b28e360 : ffffe001`a1655010 ffffe001`40200382 00000000`00010000 ffffe001`a1739400 :

Other option is to upgrade PowerPath 6.0SP2 to PowerPath 6.3 which have all the fixes above.